Friday, June 29, 2012

The Wedding Quilt

A good view of the feathered wreath

The feathered wreaths will be the main design of the overall quilt

Poor scared puppy!
With the lack of travel for work I have been able to work on the wedding quilt a bit more in the evenings. I have a few more of the designs done and have included a pictures. These were done last night during a great thunderstorm we had here in NW Indiana. Roxy is terrified of the storms so she proceeded to hide between the sewing table and the wall!

Tuesday, June 26, 2012

How do you store your fabric?


A recent thought came to be concerning fabric storage. How do you store your fabric stash? Everyone has different ways to store their fabric, based on their individual circumstances.

The way I store my fabric is based on what type of sewing space I had over the years. When we lived in base housing on Camp Pendleton years ago, I only had a small table stuffed in the corner of our bedroom dedicated to sewing. So I used those plastic tubs you can get at Target to store fabric under the bed. It wasn’t really efficient, as you had to dig through the tubs when you needed something. But for the time being, it worked. When we bought our first house in Temecula, I did have a little more room, but still no dedicated sewing space. I would set up a table in the bedroom or use the dining room table if necessary.
Now I find that I have an entire bedroom upstairs to dedicate to my sewing. Yay! (Although I do have to share a closet with my husband’s military uniforms!) I have space for both my quilting fabric and my fashion fabric. So I thought I would share some of my ideas for storing that fabric stash!!

1:             Separate the fabric for quilting and the fashion fabric (also called dressmaking fabric). It is easier for me to keep them separate as they are used for such different projects.
2:             Prewash. Whenever I bring new fabric into the house, I always prewash it before I store it. If it is machine washable, it gets washed and dried and then folded and put away. Always. This way I never have an issue wondering if I have pre washed and shrunk a fabric.
3:            I always run an iron over the fabric to get the worst of the wrinkles out and then fold the fabric and put it away in the drawers.
4:            If for some reason I can’t prewash that day, I leave the fabric in the bag I brought it home in on my sewing table. This reminds me that it is unwashed.

Currently I have two “dressers” for storing fabric. The one I use for my fashion fabric is an older blue 4-drawer dresser that used to be in my son’s bedroom when he was little. It is not the prettiest thing, but it serves its purpose. All the fabric is folded and then placed in the drawers organized by type.  (And the drawers are lined with tissue paper). One drawer for wool, one for silks and silk like, one for linings and one for misc. It works out really well and it is easy to find something when I need it.

For the quilt fabric, I use a plastic 3 drawer-rolling cart (like you get at Target). I keep solid quilting fabric in one and the printed fabric in another. The top drawer is used for misc quilting stencils and perhaps some unfinished quilting blocks.

I also have a large metal shelving unit that I use for books, sewing magazines and all my notions. I use the colored printed boxes that you can get a Michael’s very inexpensively. (Perhaps 5 for $10?). They are called photo boxes and used for storing pictures for scrapbooking. I label them and it keeps everything organized. One each for thread, ribbons, sewing notions, zippers, bias tape, etc. They look really pretty sitting on the shelf and it is so easy to find what I am looking for.

So that’s my way of organizing my sewing room and fabric stash. Everyone has different needs for their sewing and is at a different place in their life. This works for me, but might not work for everyone.

So how do you store your fabric??

Sunday, June 24, 2012

Some more Oldies!

A Simple nine patch

This one had sports fabric in it for my nephew

A grandmother's fan quilt

This one used pre printed panels that were scenes of Amish life
Since I am taking the weekend off from quilting to give my fingers a rest, I thought I would share some older quilts that I had made. These were all made in one year for my nieces/nephew. I ended up doing something like 6 or 7 quilts that year, because I also made a quilt for Meghan to take with her to college. My fingers really hurt that year!!!

Thursday, June 21, 2012

The Wedding Quilt

The lovebird design!
Shown below is the center section of the quilt which has been hand quilted with the design. The center is the only portion which will have this type of design, the remainder of the quilt will be a little different. I thought that the two lovebirds was a cute idea, with the hearts and all! Not traveling the last few weeks for work makes it a little easier to work on this at night. I am sure that will change soon!

Tuesday, June 19, 2012

Some Oldies but goodies!

So I thought I would post some pics of one of my last quilts that I made. This is a quilt which is pieced, the more traditional way. It is machine pieced and then hand quilted. It is completely different than the one I am making for the wedding but pretty just the same! 


Monday, June 18, 2012

The Upstairs Sewing Room: The Wedding Quilt

The Upstairs Sewing Room: The Wedding Quilt: My old PVC quilting frame. Still works great!! Pins and needles ready for use! The hardest part of the process! Of course with m...

The Wedding Quilt

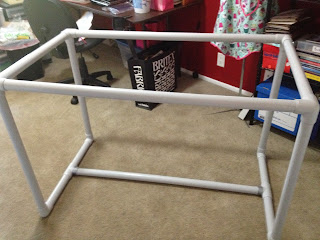
My old PVC quilting frame. Still works great!!
Pins and needles ready for use!
The hardest part of the process!
Of course with my daughter getting married, I had to make the wedding quilt. It was a given. I have been making quilts for years and probably have made about 5 just for her. However, this one has to be different. Special. It is for her wedding!  (of course I am also making the wedding gown but one thing at a time!!)


She requested a wholecloth quilt. For those of you that don't know what that is, I shall explain! Most people think of quilts as tiny pieces of fabric sewn together to make one bed-sized quilt. That is one way to quilt, and I have made countless types of those quilts. But a wholecloth quilt is one large piece of fabric with an elaborate design quilted onto it. It can also be called a bridal quilt. I made one for my brother about 15 years ago for his wedding, all in white.

However Meghan decided that she wanted a navy blue wholecloth quilt with white stitching. So that is the one she will get! The design is traced onto the fabric and then quilted by hand using white thread. The tracing is the hardest part (IMO), mainly because I have to use a lightbox under the fabric (remember, dark navy colored fabric), and hand trace the pattern. Now leaning over the table for hours doing is just does wonders for my back, so I get a little cranky! But that is what my baby girl wanted, so that is what she gets!
And Away we go! Starting this blog to let the world know all about my sewing and quilting projects! Although my husband calls me the Great Technology Killer, I have high hopes that I can manage this blog without too much stress on him (and myself!). I have several upcoming projects in the works that might be of interest, including my daughter's wedding quilt and her wedding gown! So pull up a chair and grab a cup of coffee and get ready for the excitement!